 Bones MIDI
Reference guide
Bones MIDI — User Manual
Last updated: 2026-10-21
Turn what you play into editable MIDI, on your iPhone or iPad.
1. Introduction
Bones MIDI turns a recording of your playing into editable MIDI, the note data your music software reads. Record a riff, melody, chord part or sung line. Check the notes it finds, fix them on the piano roll, and export. It works with pitched playing, not drums. Clear notes from one instrument give the best start, and you should expect to make a few corrections.
Where to start:
- New here? §2 Your first take walks you through one recording, start to finish.
- Using it inside GarageBand, AUM or another app? See §13.
- Looking for the Mac version? See §14 for availability.
- Something not working? See §15.
Everything runs on your device and works offline. There’s no account, and nothing leaves your device unless you share it.
2. Getting started
Install and open
Install Bones MIDI from the App Store. You need an iPhone or iPad running iOS 17 / iPadOS 17 or later. It runs best on iPhone 13 or newer, or an iPad with an A15 chip or newer (or any M-series chip). Older devices may be slow.
You can record, transcribe, listen and fix notes for free. Exporting MIDI and using the plugin need a one-time unlock. To buy it, go to Settings → Unlock Bones MIDI. If you’ve already bought it, tap Restore Purchases there.
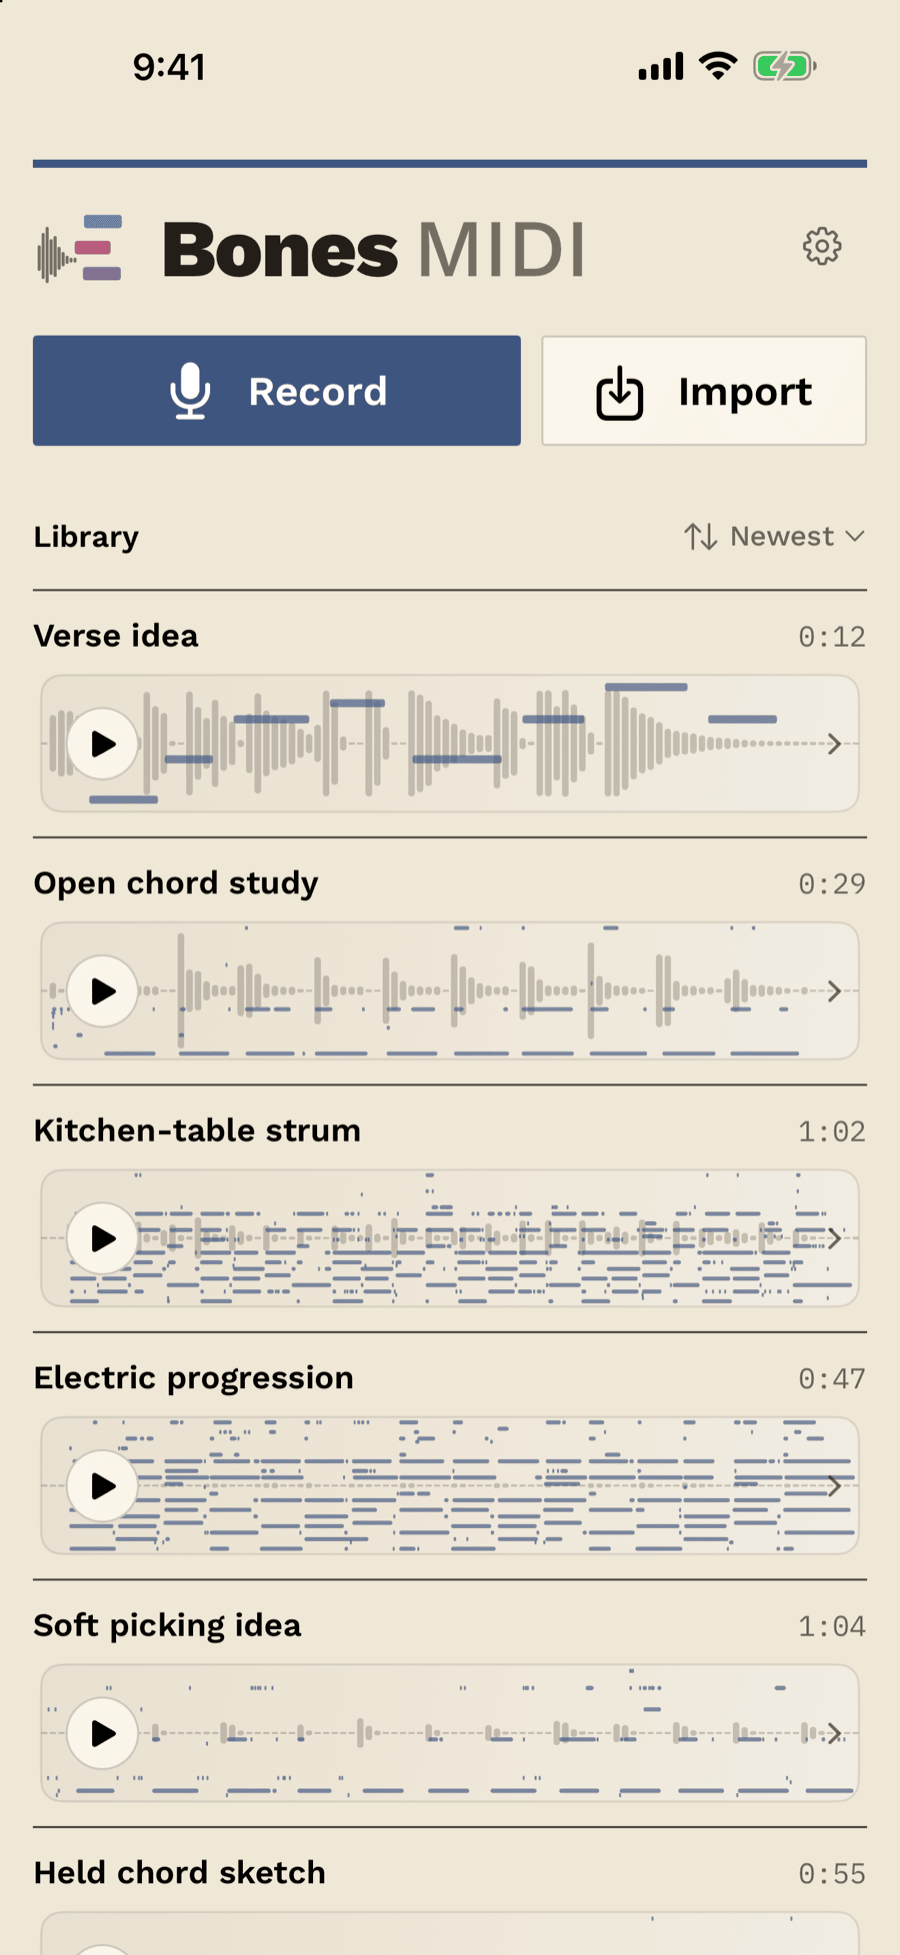
The app opens to your Library, which stays empty until you add a take. Record captures audio from the microphone, and Import brings in an audio file you already have.
Microphone permission
The first time you tap Record, allow microphone access. If you declined, turn it back on in the iOS Settings app under Bones MIDI. When the mic is blocked, Bones MIDI provides a shortcut there. Importing a file does not need the microphone.
Your first take
Let’s get one idea from your instrument into a MIDI file. It takes a couple of minutes. Pick something short and simple for this first one, like a single-note riff or a few bars of melody.
- Record it. Tap Record. If you’re happy playing to a steady beat, leave Click on and set a comfortable tempo; otherwise choose Free (§3). Tap Record, play, and tap Stop. Already have a recording? Tap Import in the Library instead (§5).
- Let Bones MIDI listen. Tap Continue to Detection and give it a moment. Your notes appear on a piano roll above the waveform.
- Check it by ear. Set Mode to Mono for a single line (Poly for chords, Voice for singing). Press play and move Compare between Source and MIDI to hear what needs fixing.
- Fix what’s off. Nudge a detection slider (§8) or edit individual notes (§9). It won’t be perfect, and it doesn’t need to be.
- Get it out. Open Export and tap Save MIDI or Share (part of the one-time unlock, §12).
Your take stays in the Library, so you can come back and keep working on it any time.
3. Recording audio
Open the Library and tap Record. Before recording, choose Click or Free. The Tuner button on this screen helps you tune your instrument.
Click or Free
This comes down to one question: are you ready to play it at a steady tempo?
Click is for when you are. A metronome plays while you record, so Bones MIDI knows where every beat falls, and your take comes out with a beat grid already in place. It is also how you record a tricky part slower than the song: play it at a comfortable tempo, then speed the MIDI up in your DAW.
Free is for when you are not sure yet, or you don’t want a set tempo at all. Play however feels right. Afterwards, you tap along once to give the take a beat map (§4).
Either way, you’ll want a beat map before you snap notes to the grid, add swing, or drop the part into a session at the right tempo. Click gives you one for free; Free has you tap it in. The app remembers your choice.
Click settings. Set BPM with −/+, or tap the Tap tempo pad in time. Beats per bar runs from 2 to 7. Click output is Audible (plays through the audio route shown) or Visual only (a large beat display). The click itself won’t become notes, but through the speaker it can occasionally split a note that’s still ringing. For sustained parts, use headphones or Visual only. You will still hear an audible click when you play back the recorded audio. Changing these settings does not start recording.
Free tip. Count yourself in for a bar. It makes the first beat easier to place when you map the beat later.
Capture your playing
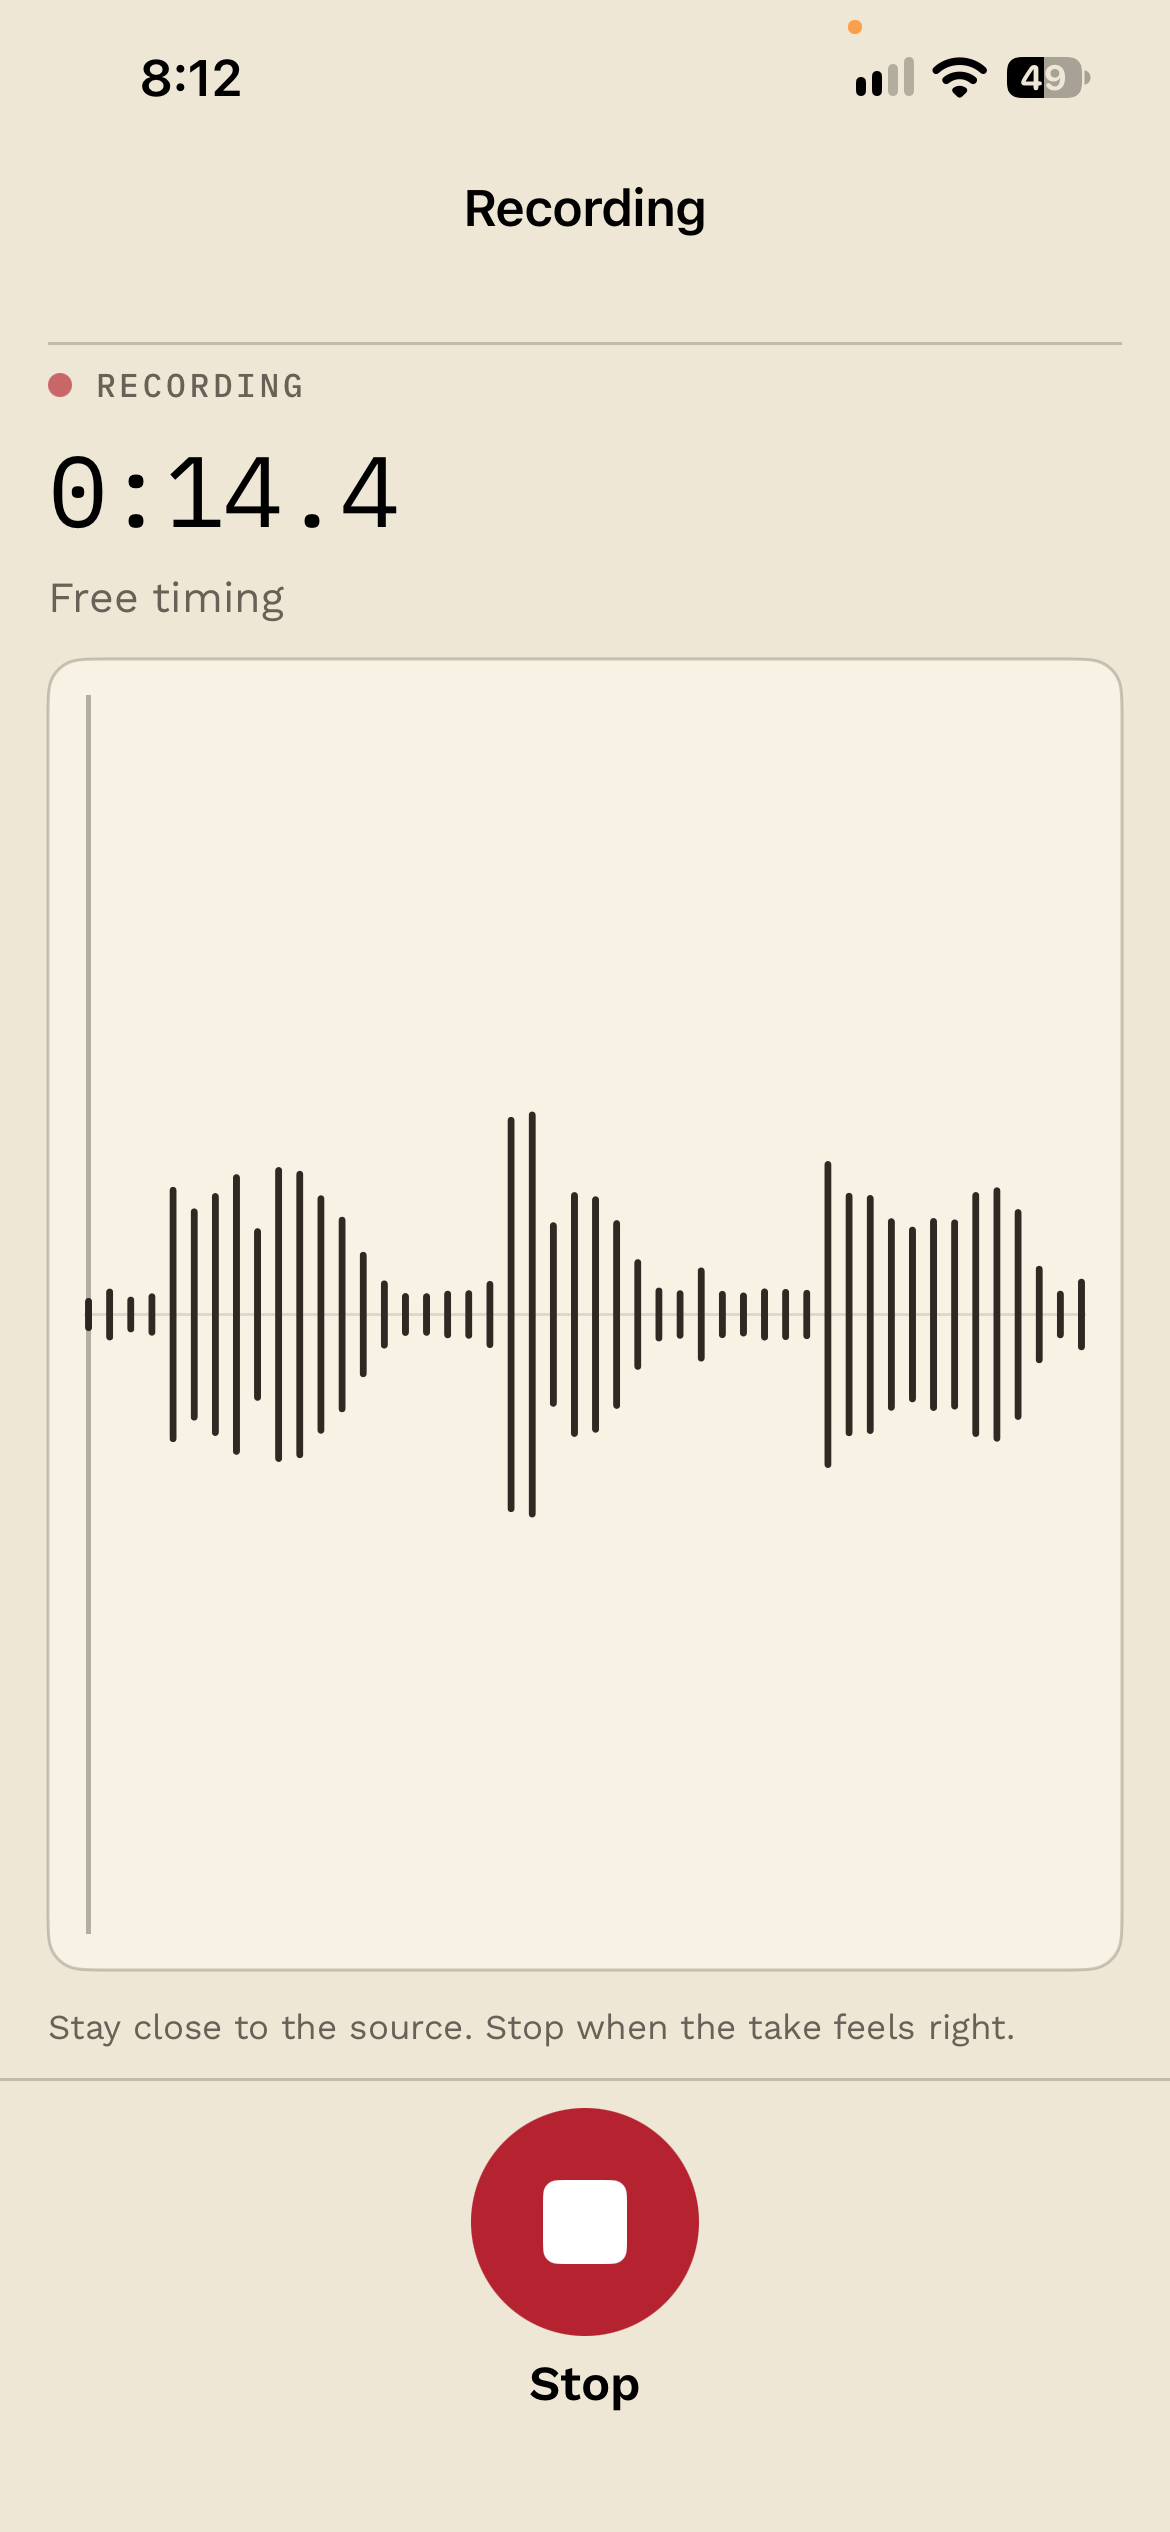
- Tap Record. Capture starts immediately, with no count-in. In Click mode, the metronome starts at the same time; play lead-in bars if you need them.
- Watch the elapsed time and waveform, or the visual beat display. An Input clipping warning means the signal is too loud; move away from the mic or reduce the input level.
- Tap Stop when finished.
Recording is mono. Before you start, listen to the room and check the input route: a distant microphone or a noisy room can make detection harder. Keep a steady distance from the built-in or connected microphone. Short, focused takes make it easier to hear and correct mistakes.
After you stop
Your take is saved as soon as you stop. Take saved lets you play it back and choose what’s next:
- Continue to Detection finds the notes.
- Create Beat Map maps the beat of a Free take first (§4). A Click take already has one.
- Retake goes back to the recording setup. The old take stays until the new one is saved.
- Discard deletes the take, after asking you to confirm.
If saving fails, tap Try Save Again. Take too short means you need to record a longer phrase.
4. Tempo & beat-tap
Creating a Beat Map
A beat map is a row of markers, one on every beat of your take. It’s what lets you snap notes to the grid, add swing, and line the part up in a session. You make one by listening back and tapping along, like tapping your foot. Tap the pulse you’d count, not every note.
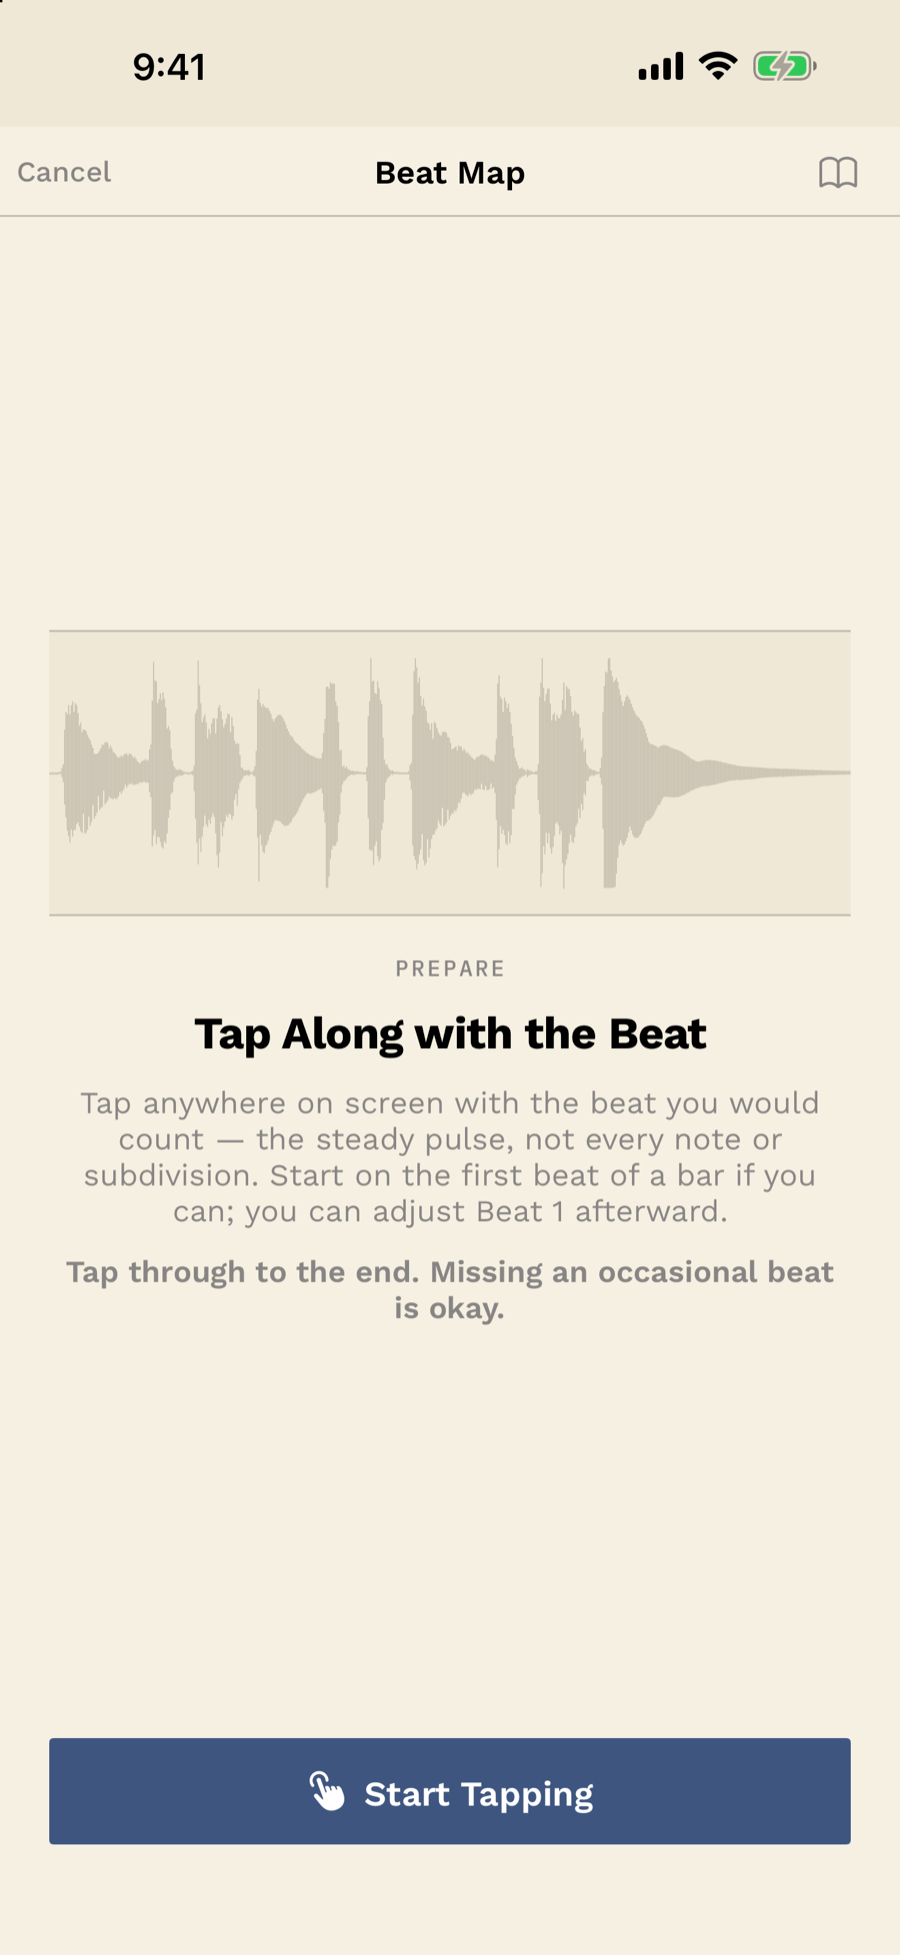
A Click take already has one, recorded with the click. For a Free take or imported audio, tap Create Beat Map: it’s offered when a Free take is saved, and in Timing for any take. It takes three steps:
- Get ready. Have a look at the waveform. Try to start tapping on the first beat of a bar. Tap Start Tapping and you get a 3-2-1 (Cancel Countdown if you’re not ready).
- Tap. The take plays from the top. Tap anywhere in time with the beat. Restart throws the attempt away; Finish & Review stops.
- Check it. Play with Beat Clicks plays your take with a click on every beat you tapped; tap the waveform to start playback later in the take. If it sounds right, tap Save Beat Map. Stray taps Bones MIDI ignored are marked; Use All Taps puts them back. If a few beats are off, Adjust Beats lets you fix them one at a time. If the whole thing is off, Retap. Cancel leaves without changing a saved map.
Don’t aim for perfect. It’s fine to miss the first beat, or a beat here and there: Bones MIDI fills in the gaps where it can, and you can fix anything else afterwards.
Adjusting individual beats
Adjust Beats is where you fix the few beats that landed a little early or late. A typical fix: select the beat, line it up with the waveform by eye, tap Snap to pull it onto the nearest likely note attack, then listen.
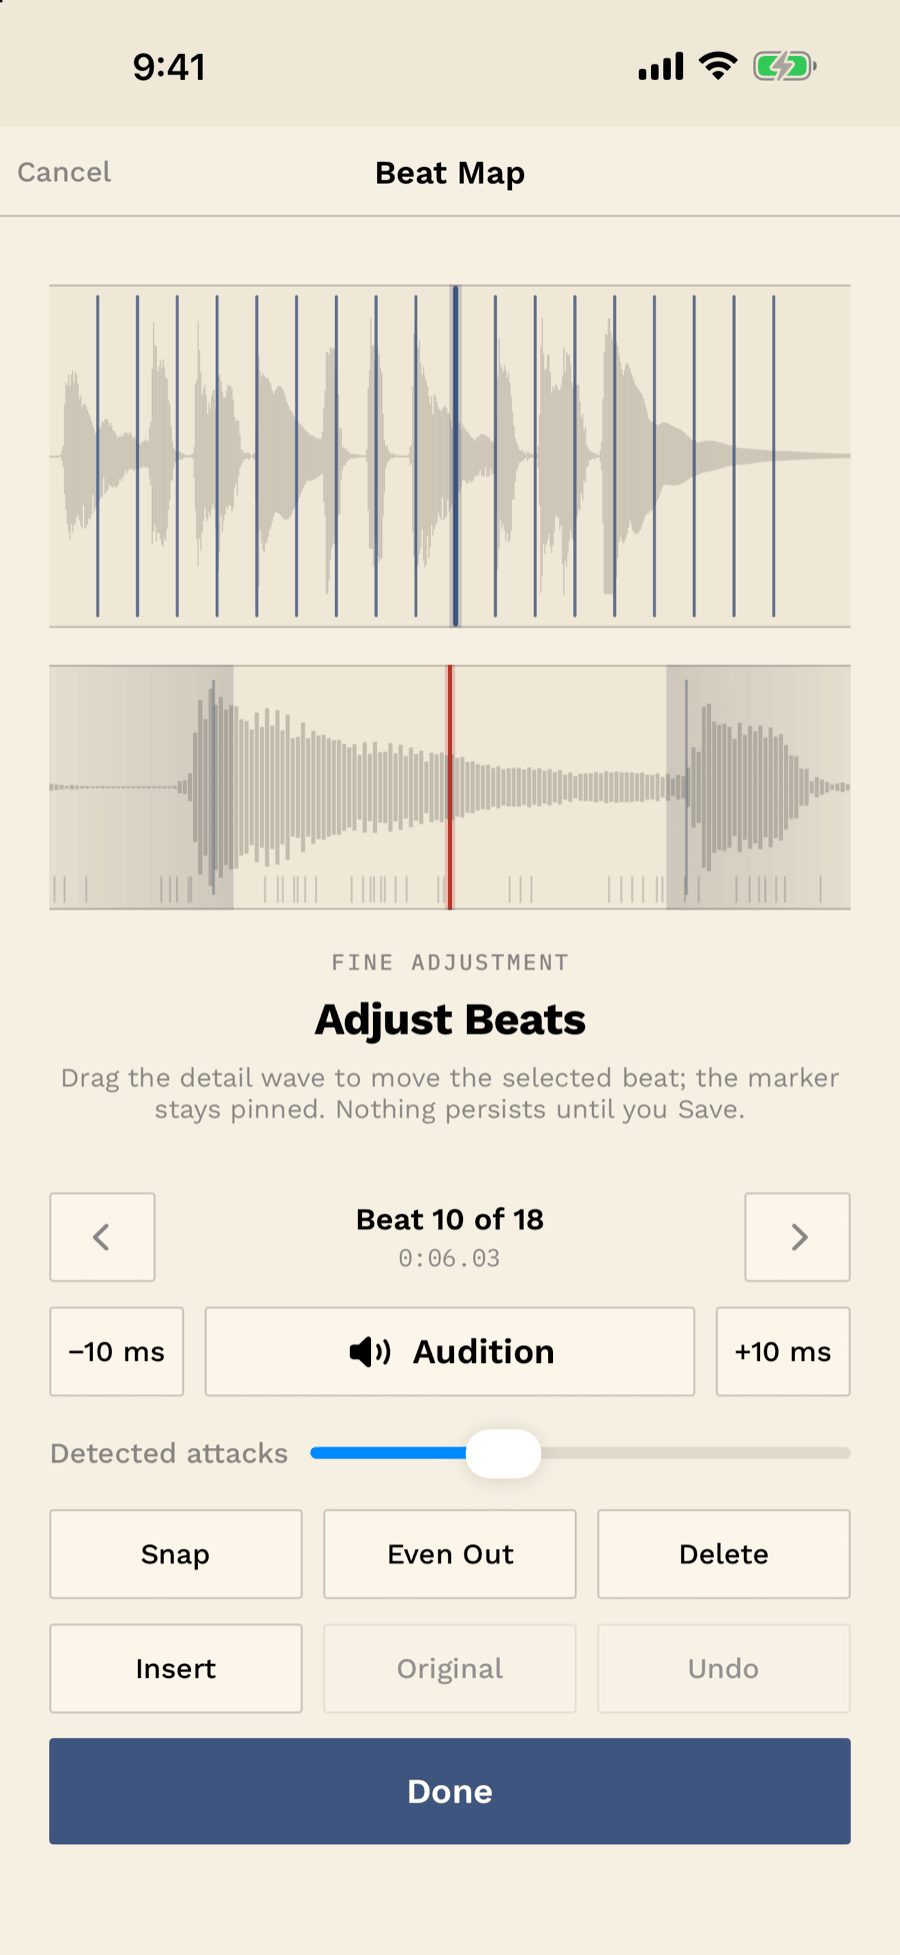
Getting around. Tap the overview to jump to the nearest beat, use the chevrons, or swipe the detail lane with two fingers (left for next, right for previous). The selected beat always sits in the middle of the detail lane. Pinch to zoom in close; double-tap to zoom back out.
Moving a beat.
- Drag the detail lane to slide the beat against the waveform. Let go and you’ll hear a short clip with the click on the marker.
- Snap moves it to the nearest detected attack. It’s dimmed when nothing is close.
- ±10 ms nudges it a hair; Audition plays the clip again.
- Even Out puts it exactly halfway between its neighbors. Use it where there’s nothing to snap to, like a held note or a rest that falls on the beat.
- Original puts it back where you tapped it (shown as a dashed line).
Adding and removing. Insert adds a beat at the center line; Delete removes one and leaves a gap.
Detected attacks controls how many attack ticks are drawn. Slide left for only the clearest, right to include quieter ones. Bones MIDI remembers this setting.
Undo steps back; Done returns to the review. Once you’ve edited beats by hand, what you hear is exactly what gets saved, and Use All Taps no longer applies.
Changing it later
A ring beside Timing means the take has no beat map yet. Reopen a saved map with Edit Beat Map, or delete it with Remove Beat Map. For a Click take, Restore Click Timing brings back the map recorded with the click. Timing also lets you set Beats/Bar and shift Beat 1.
5. Importing audio
You can bring in an audio file instead of recording fresh.
From the app
- In the Library, tap Import.
- Pick an audio file from Files, iCloud Drive, or wherever it lives.
- The app converts it and adds it to your Library. You’ll see Importing Audio while it works, then the take is ready to open in Detection.
Bones MIDI handles WAV, M4A, MP3, AIF, and CAF files. If a file’s format isn’t supported you’ll see Import Failed; convert it to one of those formats first.
From another app (the Share Sheet)
You can also send audio to Bones MIDI from elsewhere — Files, Voice Memos, a browser, a messaging app:
- Tap Share in the other app.
- Choose Bones MIDI from the share sheet.
- A brief Importing to Bones MIDI… screen appears, then the app opens with your file in the Library.
If Bones MIDI can’t open right away, it leaves a notification — “1 recording ready to import. Tap to open.” — and finishes the import the next time you open the app.
Imported audio behaves like a recording from here on: open it, let it transcribe, edit, and export.
6. Your recording library
Every recorded or imported take stays in the Library until you delete it. Each row shows its name, duration, and waveform; transcribed takes also show a note preview. Tap the thumbnail’s play button for a quick listen, and again to stop. Tap elsewhere on the row to open Detection.
With several takes, use Sort beside the Library heading: Date created, Date modified, or Name, in either direction.
- Rename: touch and hold the row and choose Rename, or tap the editor title and choose Rename…. An empty name restores the automatic date-and-time name. Renaming a recording does not change its MIDI export filename.
- Duplicate: touch and hold the row and choose Duplicate, to try a different edit on a copy.
- Delete: swipe left, tap Delete, and confirm. This removes the audio and its MIDI edits permanently.
The Settings gear holds the app’s appearance, recording and playback defaults, and Help (the user manual, privacy policy, and Help & feedback). Clear Cache, under Inference cache, frees space used by saved detection results. It doesn’t delete any recordings.
7. Transcription basics
Open a saved take to transcribe it, or tap Continue to Detection after recording. Processing audio… appears while the app works. Stopping a recording saves the draft; it does not immediately open the editor.
The editor has three tabs along the bottom: Detect, Timing and Export, and you’ll usually work through them in that order. Detect is where you get the notes to match the audio. Timing is where you let them move on from there: quantize, swing, even tempo. Export is the last step on your way out (§12). The piano roll stays editable on all three, so you can fix a note whenever you spot it.
Treat the first transcription as a starting point: listen before deciding what to change.
For help with a panel, touch and hold Detect, Timing or Export, then choose Help with Detect…, Help with Timing… or Help with Export…. This opens the matching section of the online manual in your browser. VoiceOver offers the same help through each tab’s actions.
Poly, Mono, Voice
Choose Mode to match the performance:
- Poly — several notes at once: chords, strummed guitar, or piano parts. Ringing notes are handled automatically; there is no Sustain setting.
- Mono — one note at a time: a bass line, flute, or lead. Use it when Poly adds phantom notes around a single melody.
- Voice — singing. It holds notes through pitch drift and helps distinguish deliberate note changes from vibrato, breath, and consonants.
Switching modes re-runs detection; notes you have edited stay as you left them (§8).
Singing a melody in
For a clear melody, sing each note as “bah” and hold the vowel until the next note. The “b” gives each attack a boundary, including repeated notes at the same pitch, while the vowel supplies a steady pitch.
Lyrics and humming also work, but may need more cleanup. Words can move the pitch inside a note; humming can hide the boundary between repeated notes. Use Voice, then adjust Pitch Hold if needed. Voice separates repeated sung attacks on its own; a missed one is quickest to fix with a manual split.
8. Fine-tuning detection
Detect is the first of the editor’s three tabs (§7): it’s where you get the notes to match what you played. Most takes need only two or three small changes. Pick the right Mode first, then move one slider at a time and listen. Your hand edits stay put while you experiment (see the end of this section), so you can’t break anything.
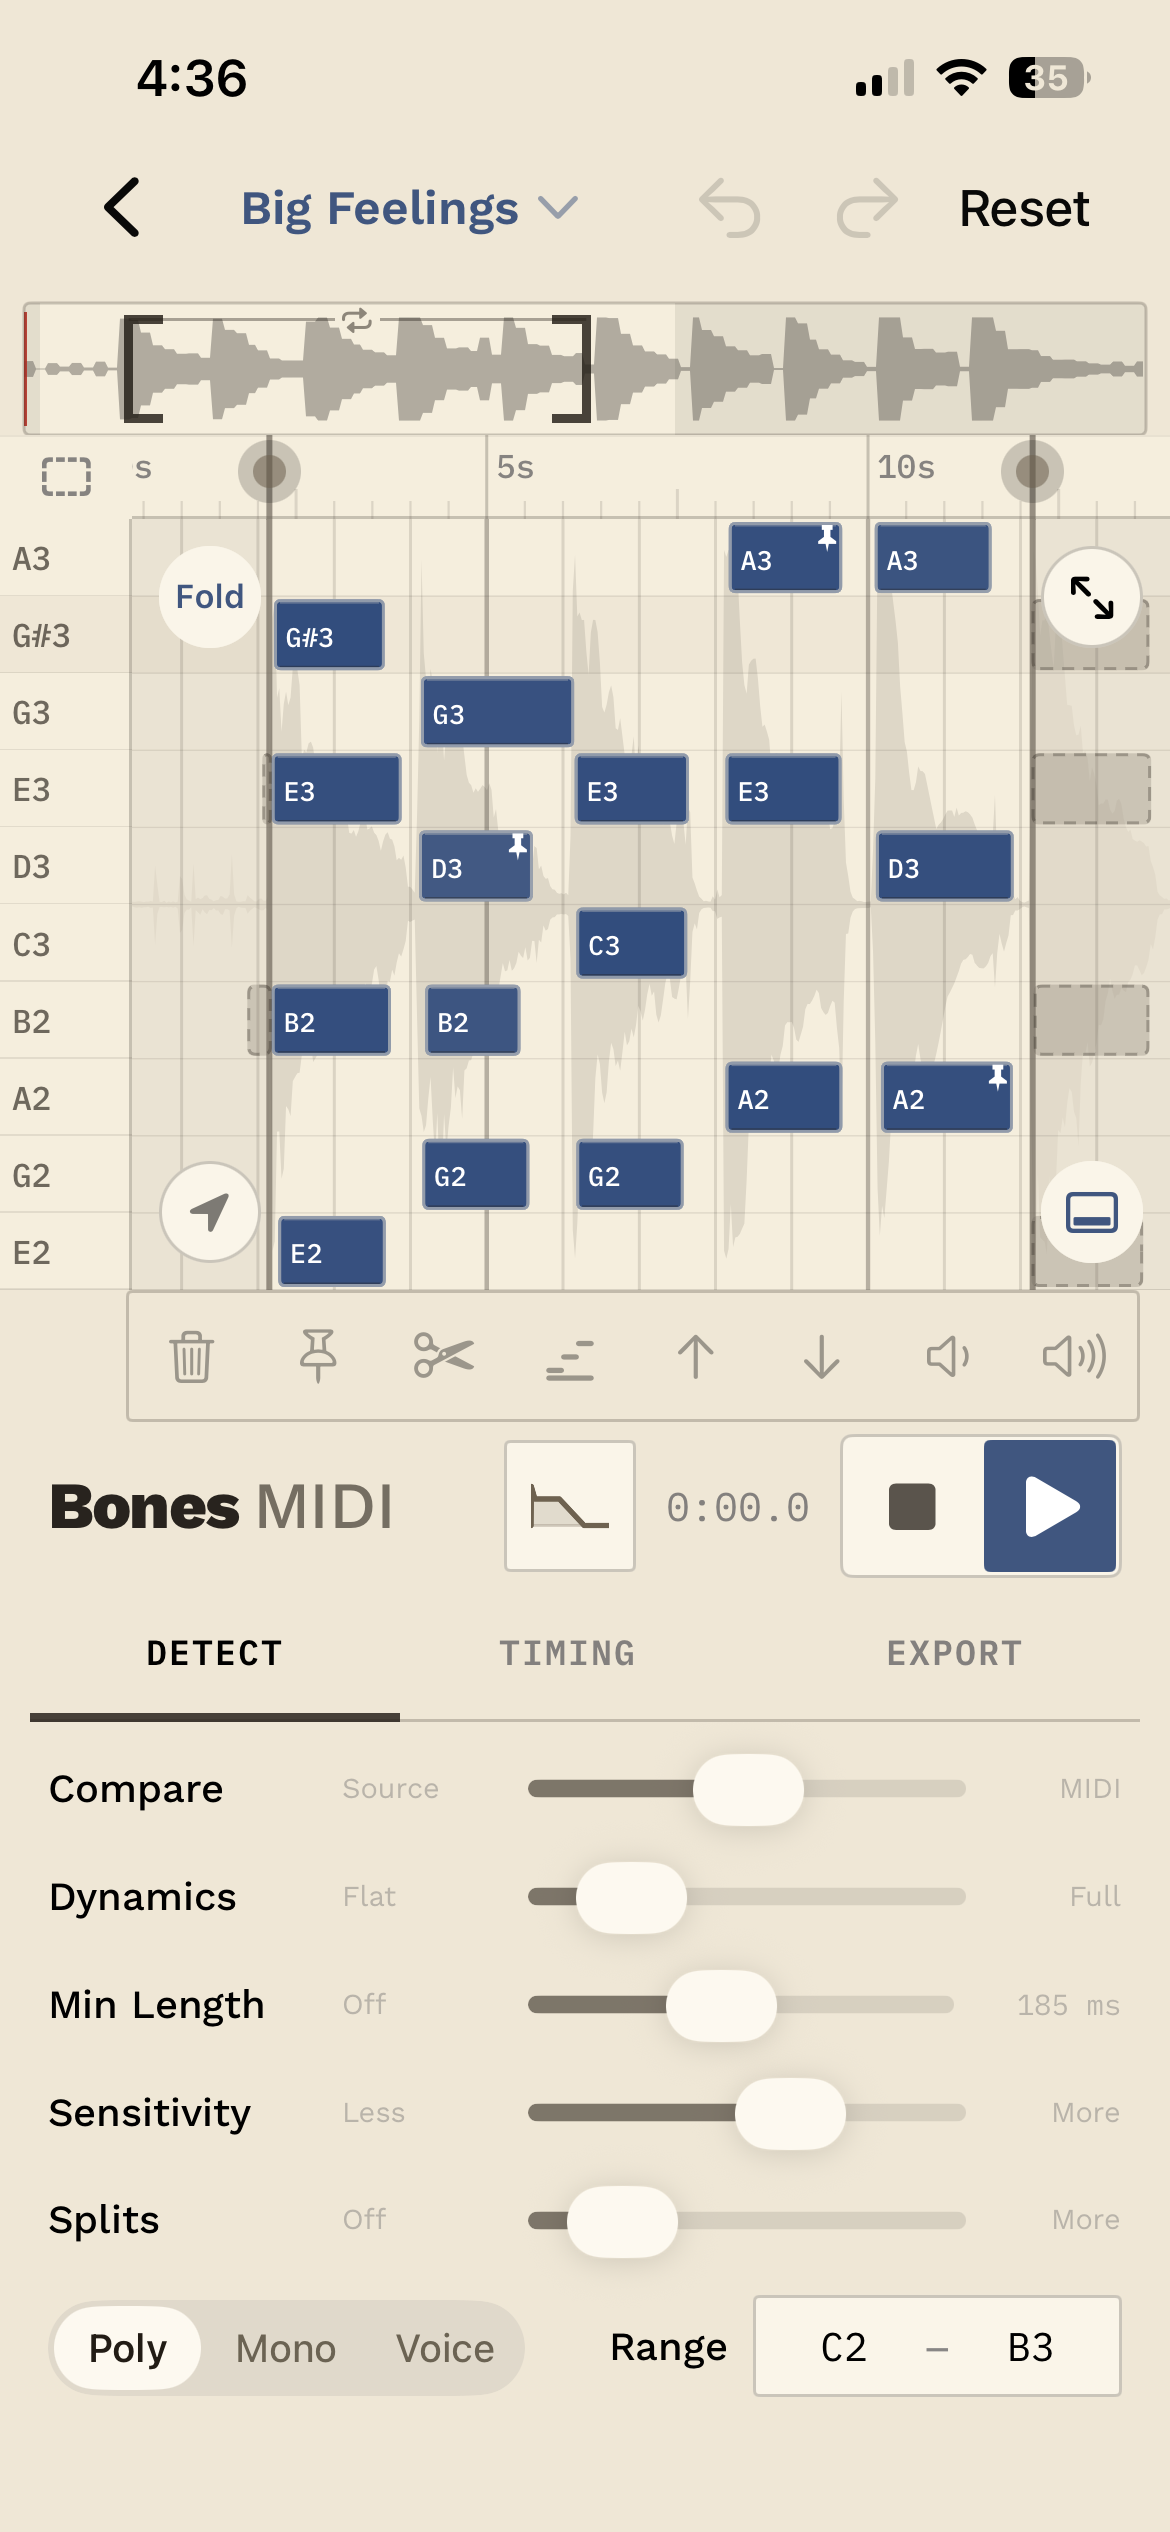
The controls
Which sliders you see depends on the mode: Sensitivity is Poly only, Splits is Poly and Mono, and Voice swaps Min Length for Pitch Hold.
- Mode (bottom left) tells Bones MIDI what kind of playing to expect: Poly, Mono or Voice (§7).
- Range sets the lowest and highest pitches to keep. Tap the min or max chip to choose a note. Narrow it to remove rumble or high ghost notes; widen it when a real note is missing. It starts at C2–C6 and can widen on its own to fit what you played. To see every note on screen, tap Fit in the piano roll.
- Sensitivity catches quieter notes as you move toward More, and drops extras as you move back toward Less.
- Splits separates repeated notes that came out as one long note. Move it toward More to catch softer repeated attacks, or to Off to stop splitting. Voice uses its own fixed rule instead.
- Min Length removes notes shorter than the setting (20 to 1,200 ms). Raise it to clear small fragments, or set it to Off to keep everything. Check it isn’t removing quick notes you actually played.
- Pitch Hold (Voice) keeps a sung note in one piece. Raise it if vibrato or drift breaks a note apart; lower it if quick, deliberate pitch changes disappear. Split a missed repeated note by hand with Split (§9).
- Dynamics sets how far apart soft and loud notes are (§10). It doesn’t change which notes are detected.
A useful order
First choose Mode for the source. Next check Range, then Sensitivity in Poly. Use Splits for missed repeated attacks and Min Length for leftover specks; with Voice, adjust Pitch Hold instead. Listen to the phrase after each change. If a single wrong note remains, edit that note rather than disrupting the whole take with a large detection change.
Editing keeps working with detection
Your note edits stay put when you change detection. Moving Mode, Sensitivity, Splits, Min Length or Pitch Hold re-detects only the notes you have not touched; every note you moved, resized, re-pitched, added, deleted or re-velocitied is kept as you left it. To protect a note detection already got right, select it and tap Keep note. Kept and edited notes show a small pin.
9. Editing notes (the piano roll)
The piano roll is where you fix whatever the transcription got wrong. Time runs left to right; pitch runs bottom (low) to top (high). Each note is a block.
Getting around
- Pinch to zoom, and drag the background to scroll.
- Fit Result brings the whole take into view. Scroll to playhead brings playback back into view.
- Fold, beside Fit, shows only the pitches that have notes. With Fold off, every pitch in the Detect range shows.
- The panel button at the roll’s bottom corner hides the controls to give the roll more room. Tap it again to bring them back. On iPhone in landscape, the Detect, Timing and Export controls sit in a sidebar that starts hidden, and the same button shows it.
- The toolbar shows the current bar and beat. The metronome button adds a click during playback.
Selecting notes
Tap a note to select it; tap empty space to clear. With several notes selected, tapping a note outside the group starts over with just that one.
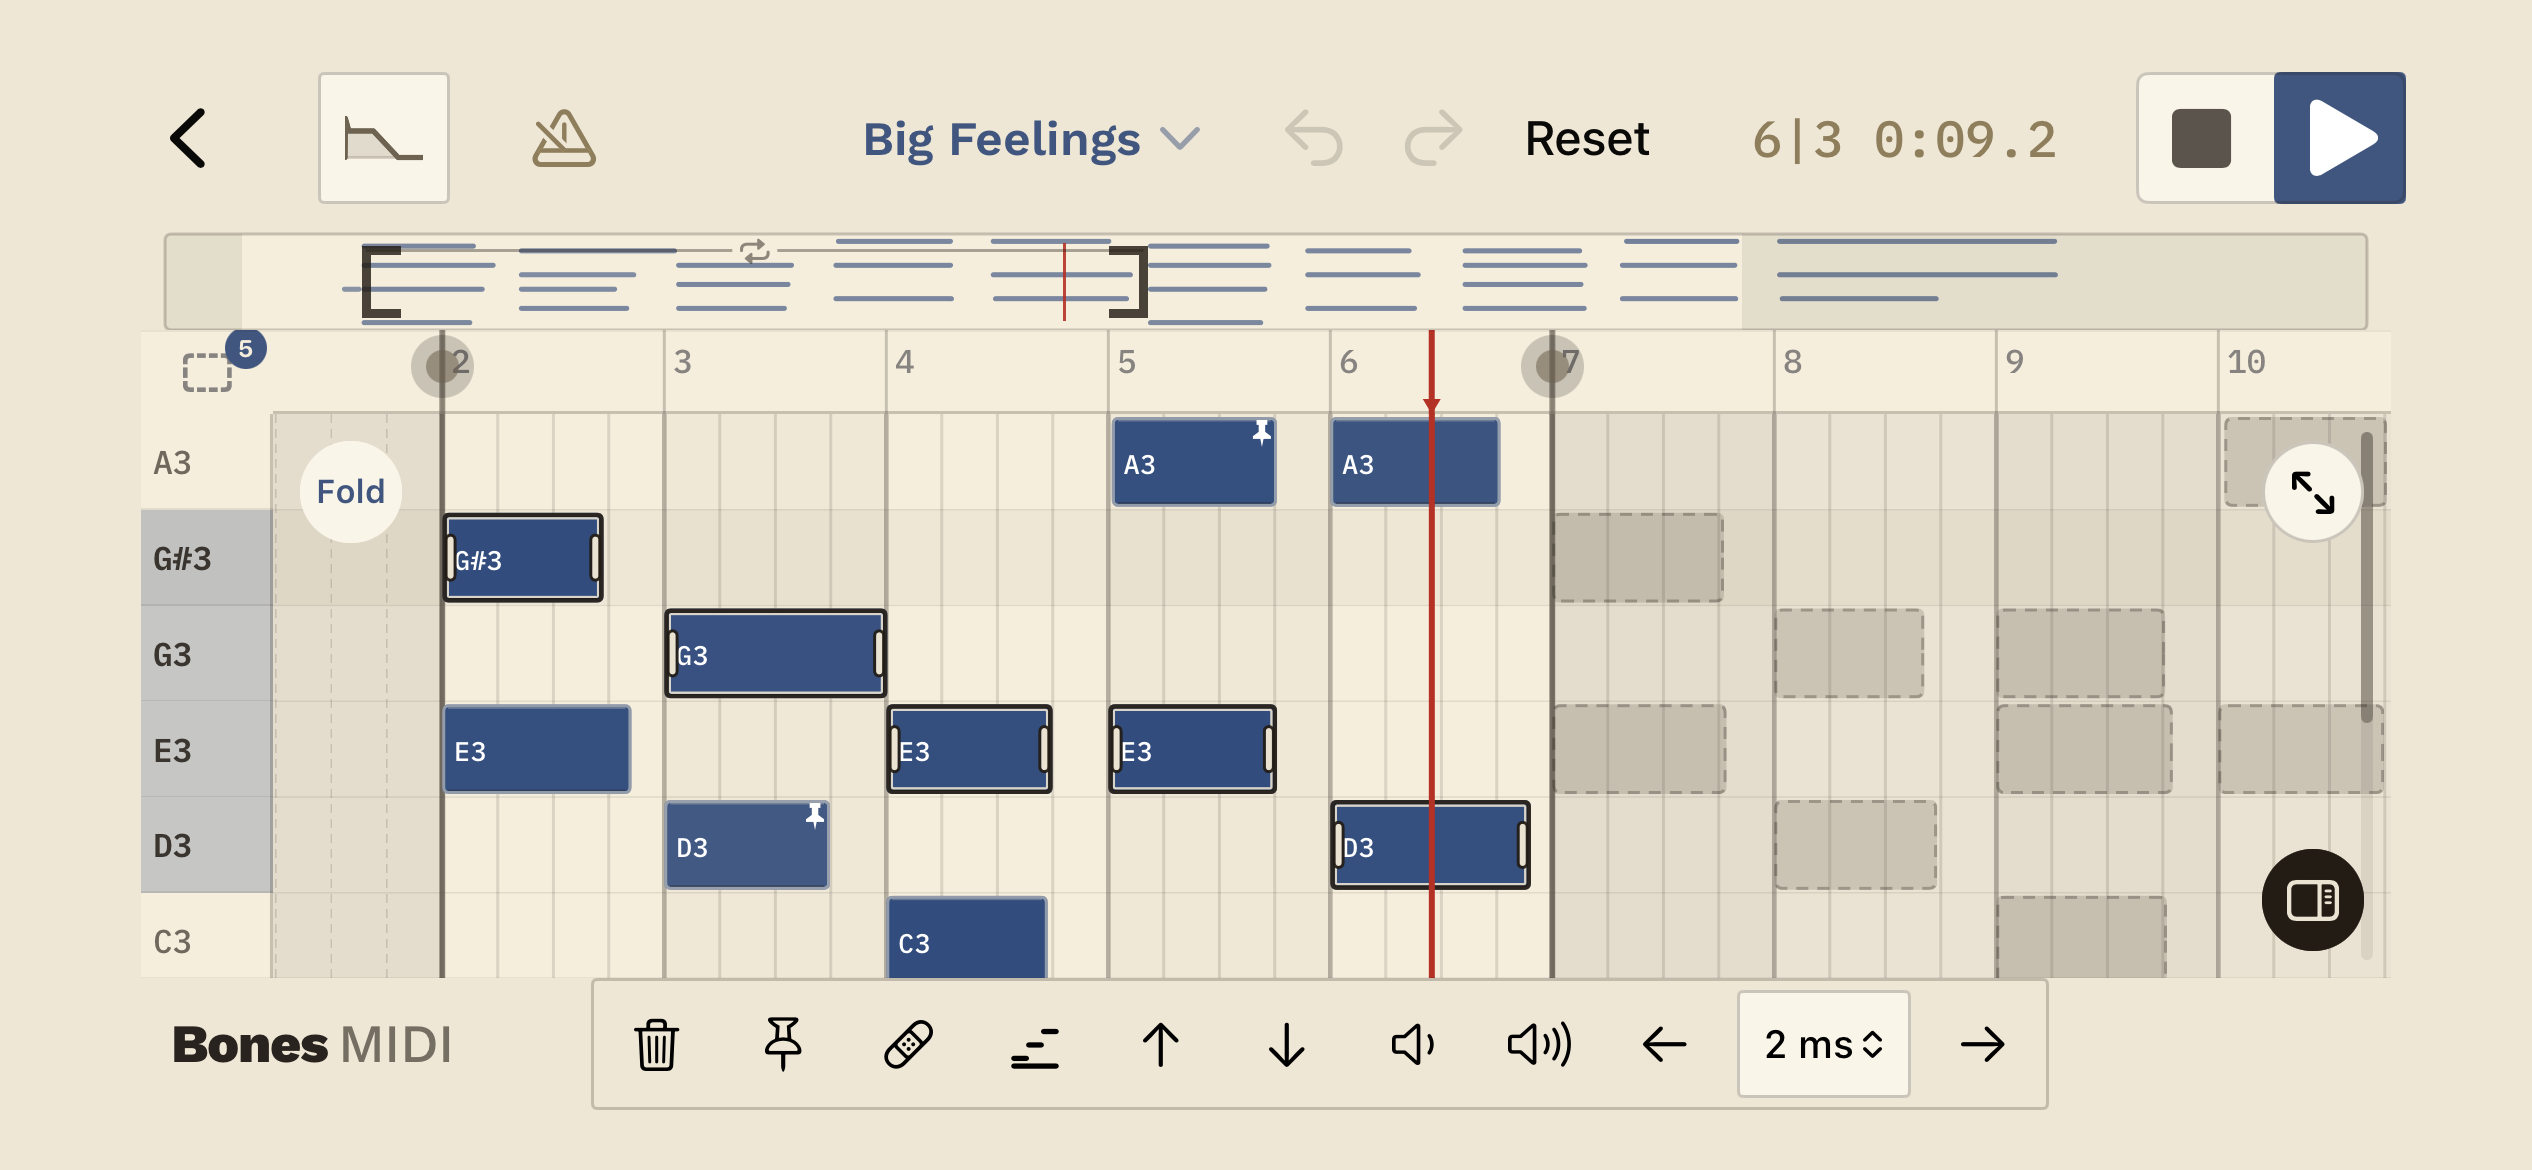
For several notes, tap the dashed-rectangle Select control in the pitch corner, then drag a rectangle over the notes, tap notes to add or remove them, or tap a pitch-row label to select that pitch. In Select mode, pan with two fingers and pinch to zoom; tap Select again when the set is ready to edit. Hold Select to select all notes.
A note excluded by the pitch range or trim range can stay visible as a dashed ghost. Ghosts do not play or export, and cannot be deleted until the notes are included again.
Moving, resizing, and joins
- Move — drag a note to slide it in time, or up and down in pitch. A selected group moves together in time and keeps its pitches and spacing.
- Resize — drag the handle at a note’s start or end edge to change where it begins or how long it lasts. An edge stops when it reaches the next note at the same pitch; it never absorbs it. To make one long note out of two, delete one and resize the other.
- Joins — when you select notes that sit end to end at the same pitch, a grip appears at each join between them. Drag a grip to move that boundary alone: one note grows, the other shrinks, and the chain’s outer edges stay where they are. Dragging an outer edge of such a chain resizes only the piece at that end. Notes split with Split are joined this way, so a split can be rebalanced afterwards.
Fine adjustments (the editing band)
The row of buttons under the roll makes small, exact changes to the selected notes. It stays inactive until you select a note.
- Delete removes the selected notes.
- Keep note / Clear edit (the pin) keeps notes as they are, or returns them to detection. See §8.
- Split (scissors) cuts one selected note in half. With two or more notes selected, it becomes Heal and joins them into one note. Clear edit on a healed note brings the original notes back.
- Velocity: makes notes softer or louder (§10).
- Timing: moves notes slightly earlier or later. To change how far each tap moves, touch and hold either arrow, or use the ms menu between them when it’s showing.
- Pitch: moves selected notes up or down one semitone. In the standalone app, hold a pitch arrow to open Up an octave or Down an octave. Use Select All first to move the whole take.
Each tap is one step you can undo. On narrow screens, some buttons give way to make room.
Moving notes into a key
Select notes and tap Scale to move them into a key. Every key and all twelve scales (Major, Natural Minor, Pentatonic Major, Pentatonic Minor, Blues, Dorian, Mixolydian, Harmonic Minor, Lydian, Phrygian, Melodic Minor, Whole Tone) appear together below the roll, or in its place when space is tight, so each comparison is one tap. Playback keeps going while you choose, so you hear the next notes in the new key. Only pitches change: each off-scale note moves to the nearest scale tone. Panning and zooming still work; other edits wait until you Apply (one Undo step) or Cancel (×).
Adding and deleting notes
- Add — touch and hold an empty part of the roll to place a new note. While you hold, drag to position it in time and pitch, then lift to drop it in. It arrives at a default length; adjust its start and end with the handles, like any other note.
- Delete — select a note (or several) and tap Delete in the editing band.
Looping a section
The trim range bar above the roll shows the whole take, with a bracket at each end. Drag the brackets inward to mark a section. Play then repeats that section until you stop it. With the brackets at the ends, it repeats the whole take.
The range also sets what you export: anything outside the brackets is left out, and the file holds the section once, not repeated.
The bar also lets you move around the take. Tap it to move the playhead there, or drag to scrub. Touching the roll outside the range plays from that spot once, without changing the range.
Undo, redo, reset
Undo and Redo in the toolbar step back and forward through your edits, one at a time. Reset, beside them, returns the take to its original notes and detection settings. It asks Reset take? first, and Undo brings your changes back.
10. Dynamics & velocity
Every MIDI note has a velocity, which usually controls how loudly an instrument plays it. On Detect, Dynamics sets the variation across the take: toward Flat, notes have similar velocities; toward Full, loud and soft playing spans a wider range. Move the slider to taste while listening. It changes expression without adding or removing notes.
For a particular note or group, use the editing band’s louder / softer buttons. With one note selected, its label in the roll shows the velocity as you adjust. Use this for an isolated note that stands out rather than flattening the whole phrase.
Velocities travel with the exported MIDI. Different instruments respond to them differently, so the same notes may sound more or less accented in your DAW.
11. Playback & sound
Press play to hear the notes; stop returns to the start. The roll follows playback, and the bar/beat counter tracks mapped timing. Touch the roll while playing to stop following and look around; press play or tap Scroll to playhead to follow again. Enable Metronome for a click alongside the phrase.
Source vs MIDI
On Detect, Compare blends Source (the recording) with MIDI (the transcription). Move fully to either end to compare them, or listen between. Use this to check whether a missing attack or wrong pitch belongs to the source or the detected notes.
Timing and Export play MIDI alone.
Choosing a sound
The Sound picker offers six playback voices: Warm Keys (the default), Glass Bells, Round Bass, Wood Mallets, Soft Bloom, and Reference Saw. Choose a voice that makes the part easy to hear. Tapping a sound previews it when playback is stopped; Done closes the picker.
These sounds audition the notes inside Bones MIDI. The exported MIDI contains note data, not recorded sound; assign an instrument in your DAW. Your choice of voice does not change which notes were detected.
12. Tightening timing & exporting MIDI
Timing tightens the rhythm; Export prepares the file. Listen after timing or pitch changes, because these settings affect the result you will send out.
Timing: snapping to the grid
Once the notes match what you played (§8), Timing is where you let them move on: tighten them toward the beat, add swing, or change the tempo. Leave it all at Off and your take keeps its original feel.
Most of this needs a beat map (§4). If the take doesn’t have one yet, tap Create Beat Map here. Takes recorded with the click already have one.
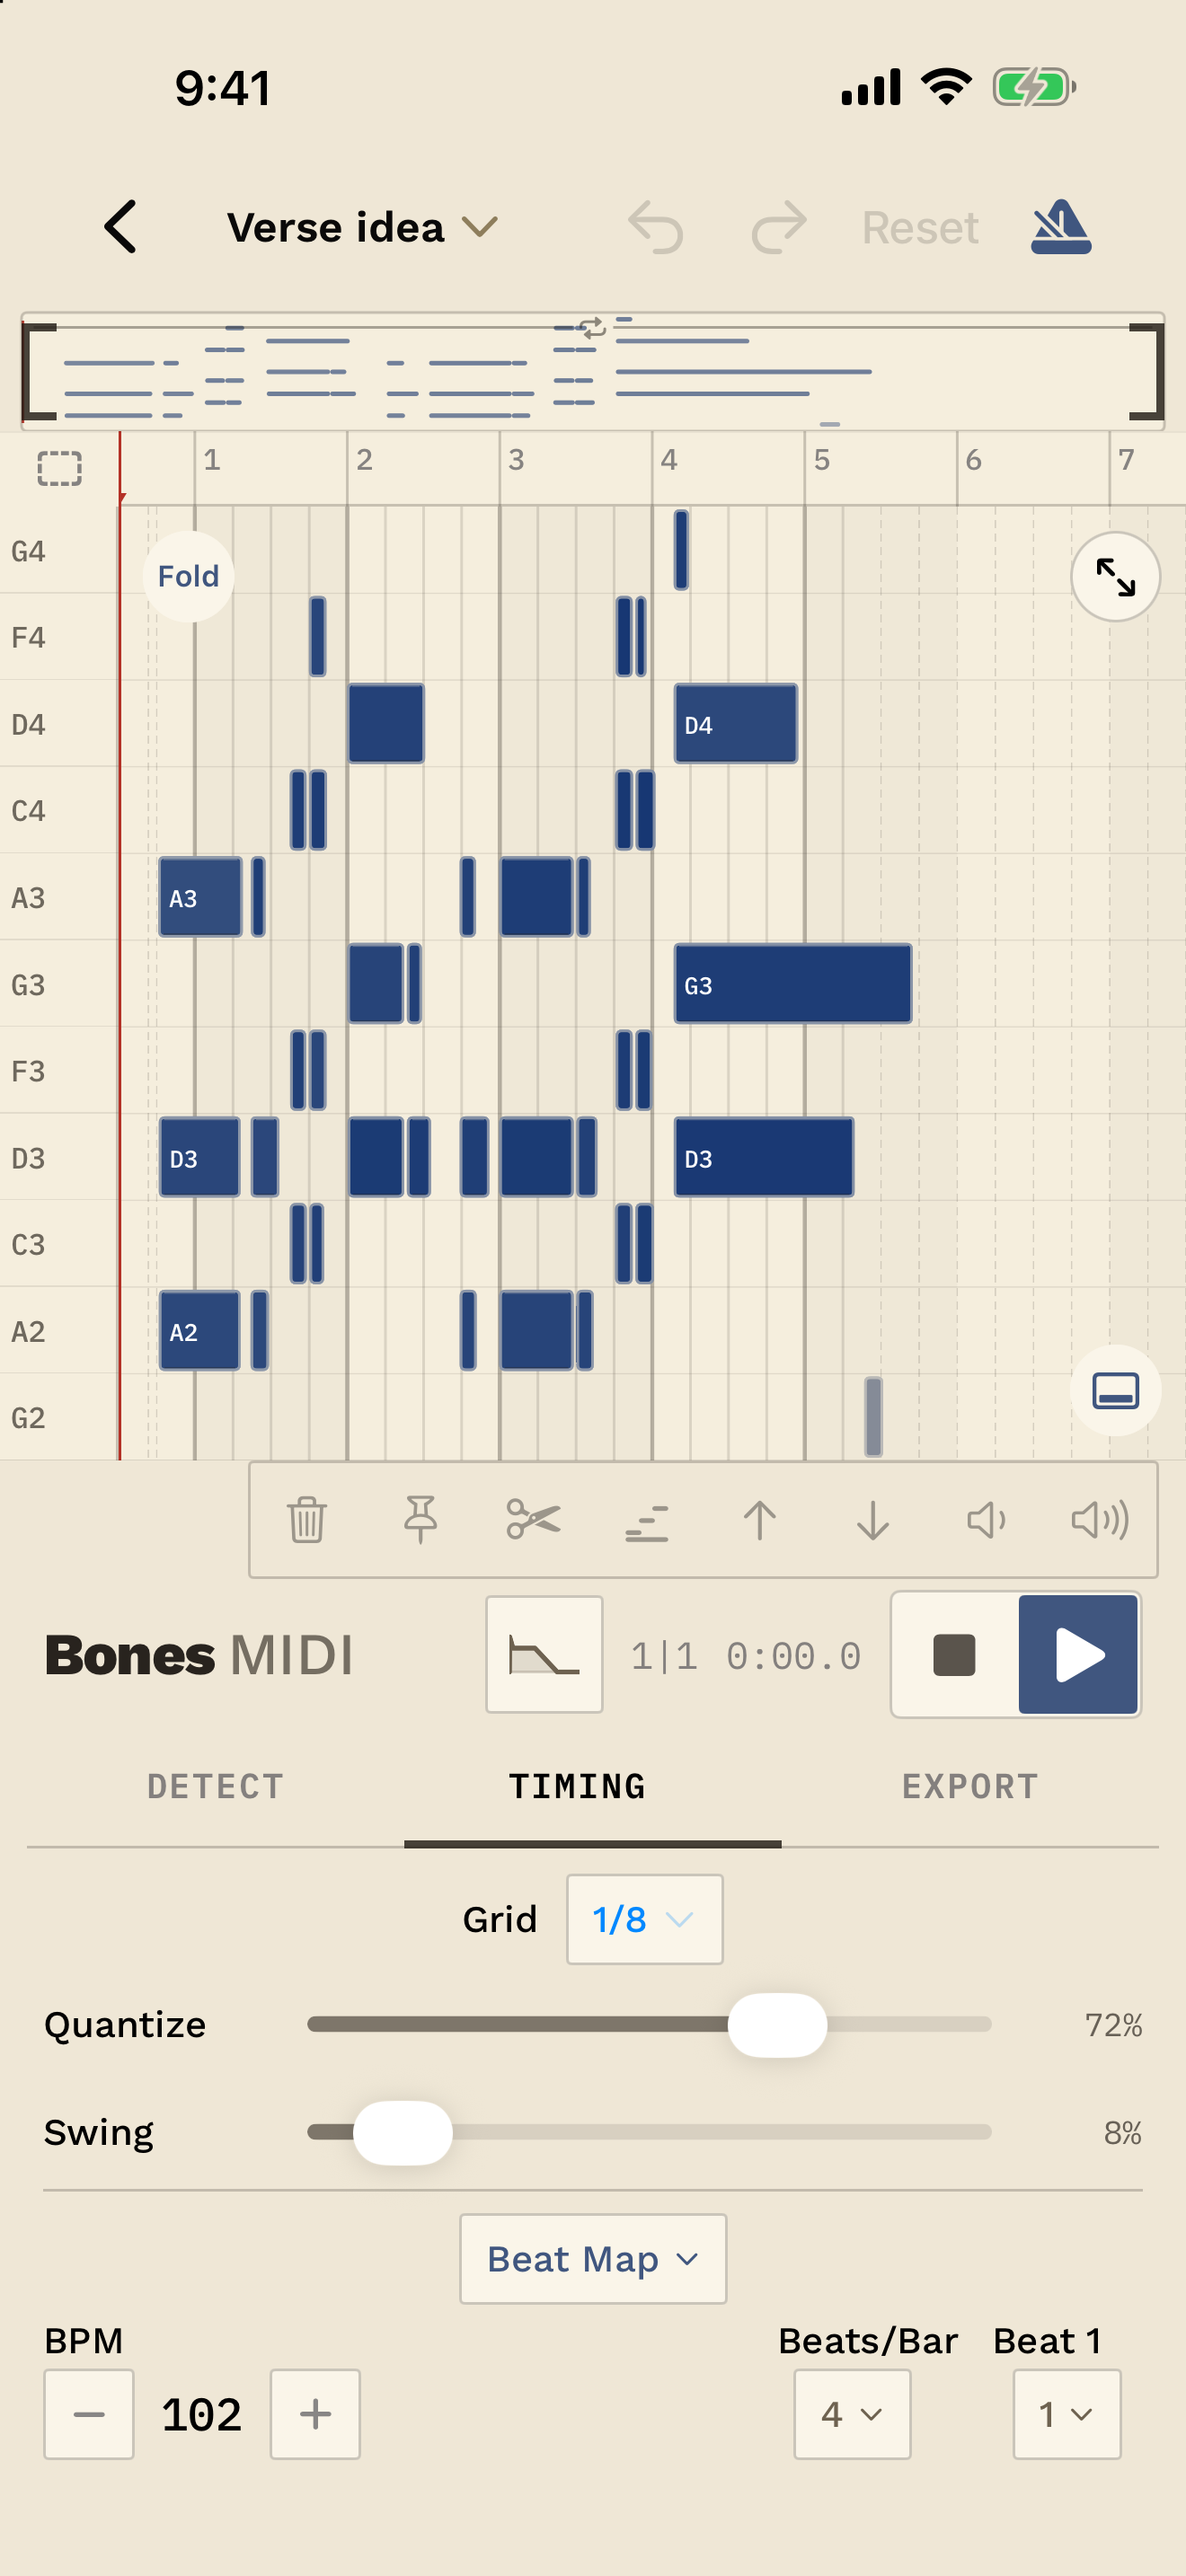
- Quantize pulls notes toward the grid. It starts at Off. Higher settings pull harder; a little goes a long way if you want it to stay human.
- Grid sets what the notes snap to: quarters, eighths, sixteenths, or triplets.
- Swing gives straight eighths or sixteenths a shuffle. It needs Quantize turned up, and doesn’t apply to quarter or triplet grids.
- BPM −/+ changes the tempo of what you hear and export; Reset goes back to the detected tempo.
- Beats/Bar and Beat 1 line the click and grid up with your playing, so beat 1 of your performance lands on beat 1 of the grid. If quantize pulls notes to the wrong places, check the beat map first.
Without a beat map, Playback Speed (50–200%) takes the place of BPM: speed the take up or slow it down, and Export applies the change.
Export: pitch and file
Export is the last step: it turns your edited notes into a standard MIDI file you can open in any DAW. Exporting is part of the one-time unlock; if you haven’t unlocked yet, Save MIDI and Share take you to the purchase screen.
Before you export, play the take through once. Only what’s inside the trim handles is exported (§9), so a tight loop you used while editing may be cropping the start or end. If Save and Share are grayed out, no notes are left to export; check Detect, trim, and pitch range.
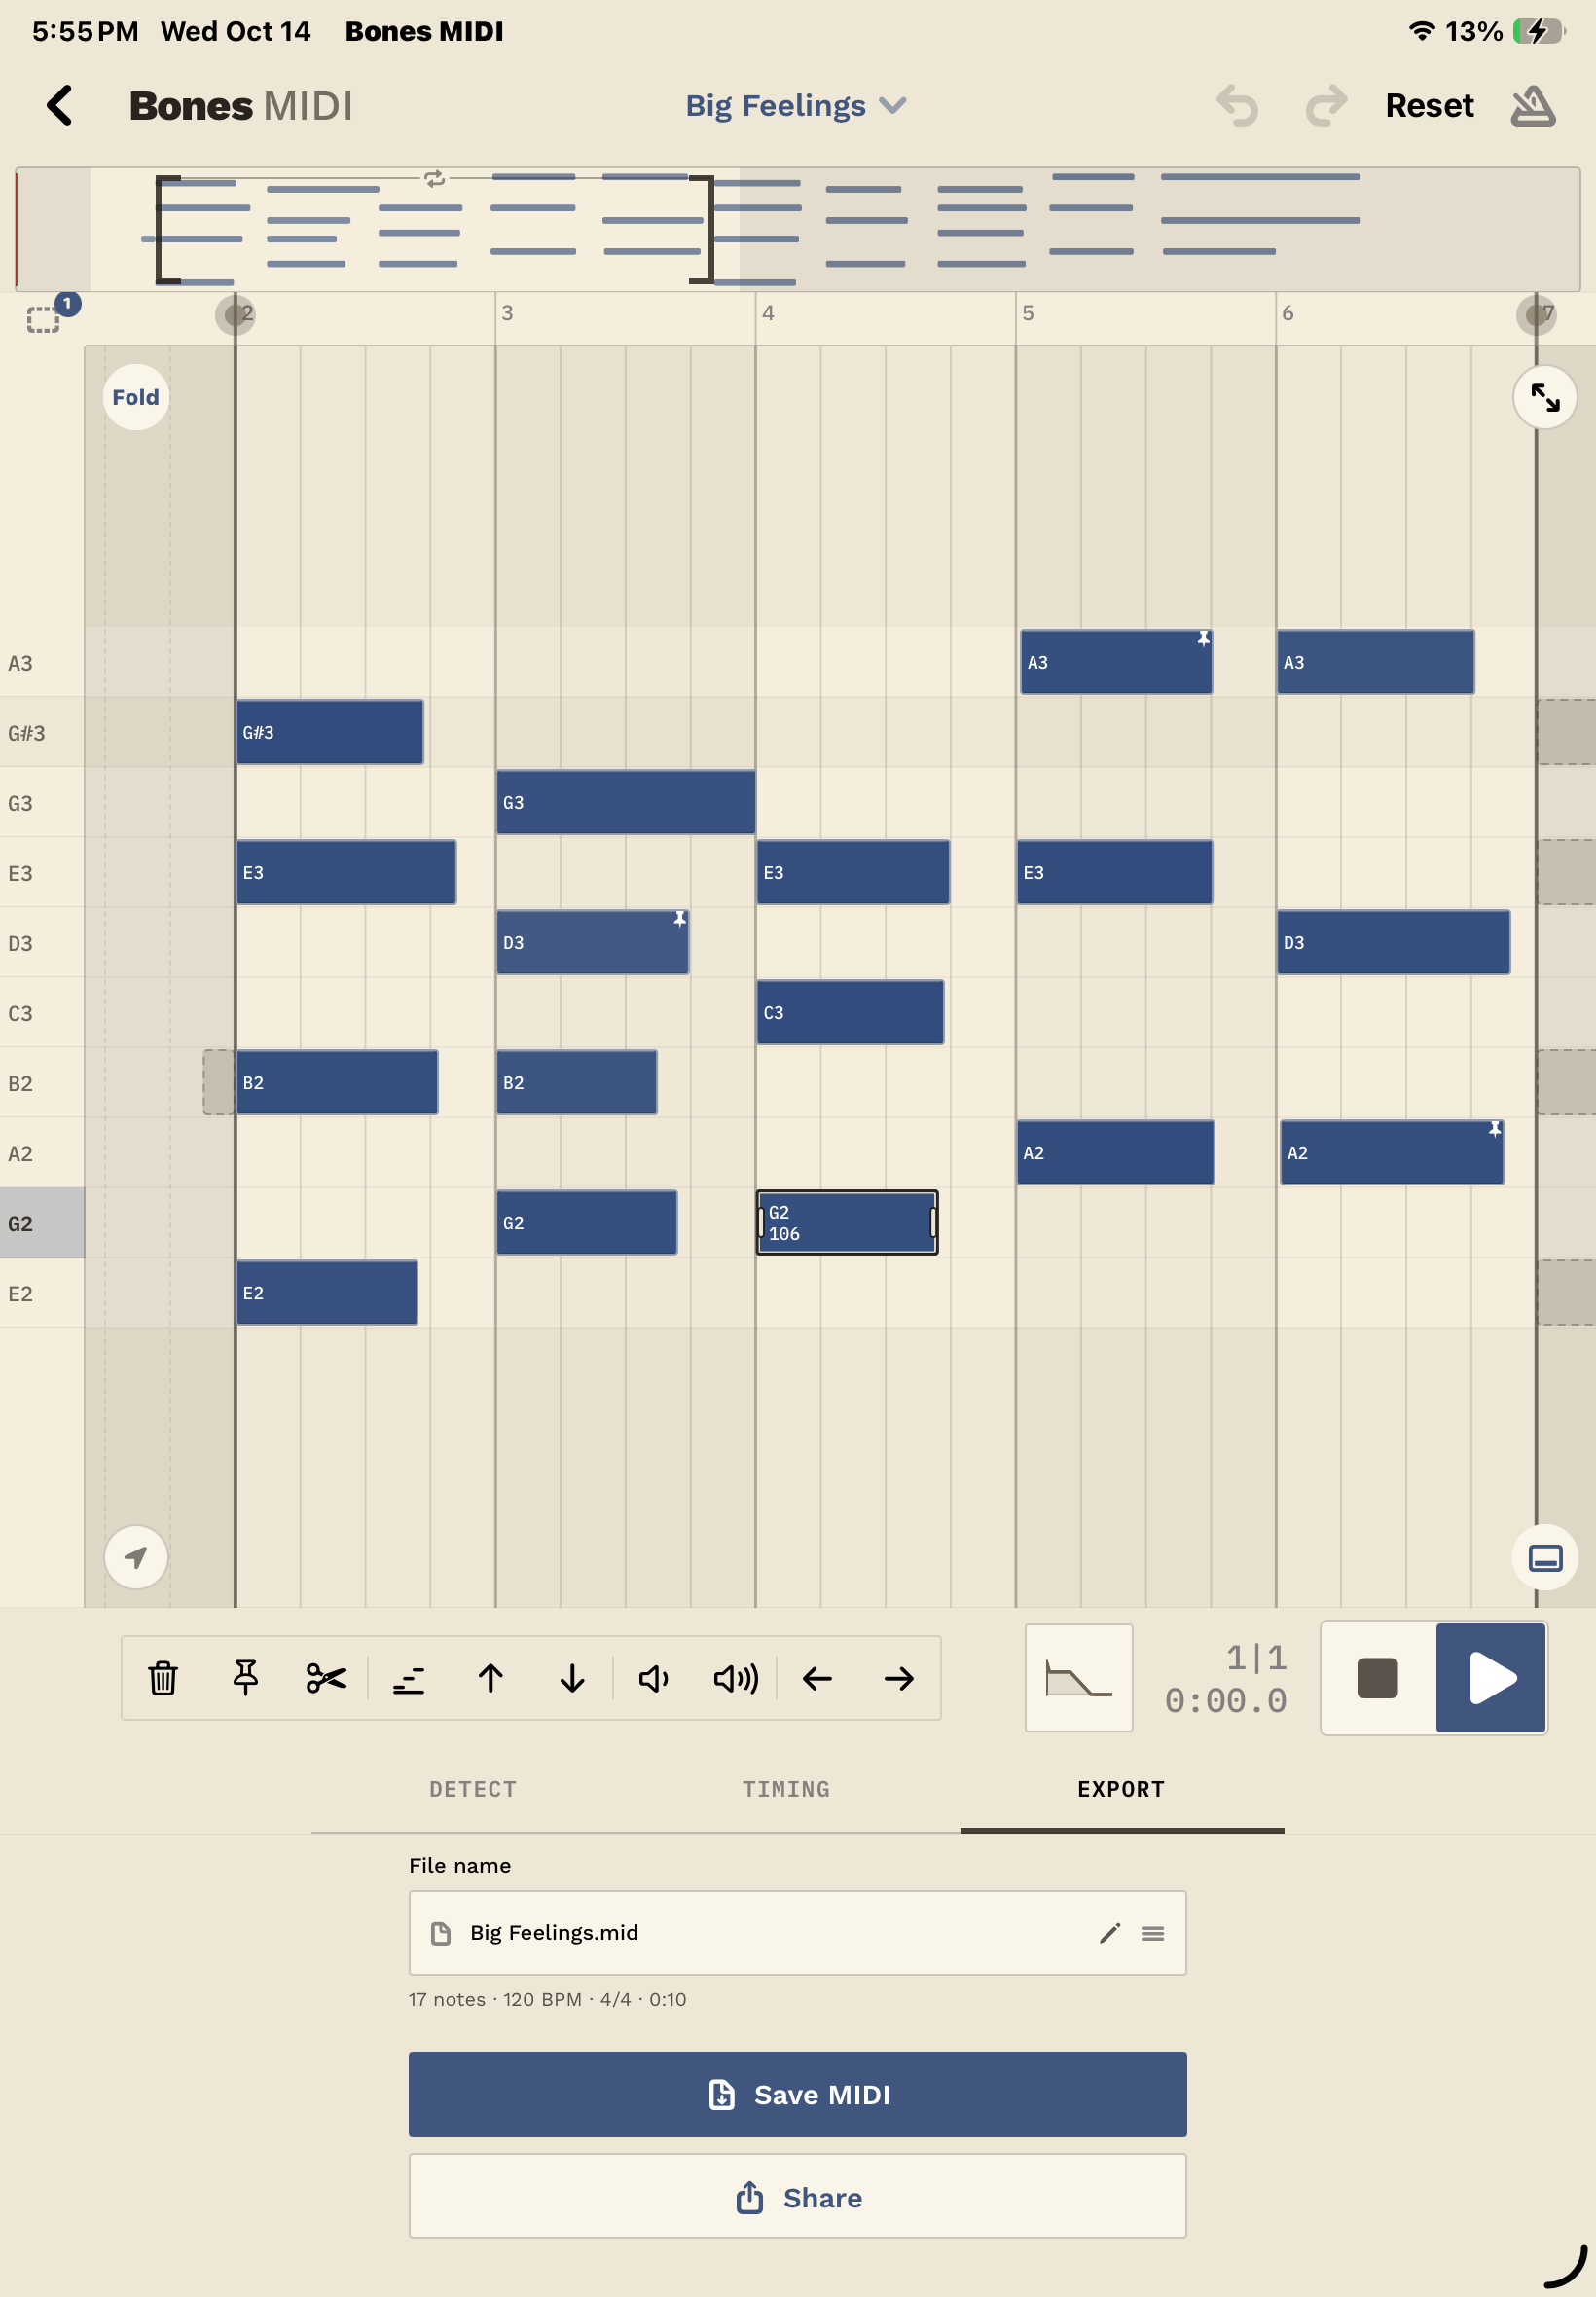
Getting the file out. The File row shows the .mid name; tap its pencil
to change it (this doesn’t rename the recording). Then tap Save MIDI to
choose a place in Files, or Share for AirDrop or another app. Confirm the
name and tap Export.
Drag on iPad. With your DAW or Files open beside Bones MIDI (Split View or Slide Over), hold the File row until it lifts, then drag it across. You get the same file Save MIDI would write.
To change register before export, select notes in the editor and use its pitch arrows. Hold an arrow for the octave menu. Select All applies the change to the whole take.
The file contains your notes, timing, velocities, and tempo. Choose an instrument for it in your DAW. For GarageBand on iPhone or iPad, see Bringing a MIDI file into GarageBand for iOS.
13. Using Bones MIDI inside another app (the plugin)
Bones MIDI also works as a plugin inside GarageBand, AUM, Cubasis, and Logic Pro for iPad. You can turn a part into MIDI right where you’re working, without leaving your session. Add it as an audio effect on an audio track. It listens to audio, so it won’t appear as an instrument or a MIDI effect.
Hearing nothing? Most hosts turn off input monitoring when you use the built-in mic and speaker, to stop feedback. Without monitoring, the plugin gets no live audio. Connect headphones (AirPods work) or an audio interface, turn on the track’s input monitoring, and check you can hear yourself before you tap Capture. Or record the part in the host first, then capture while it plays back.
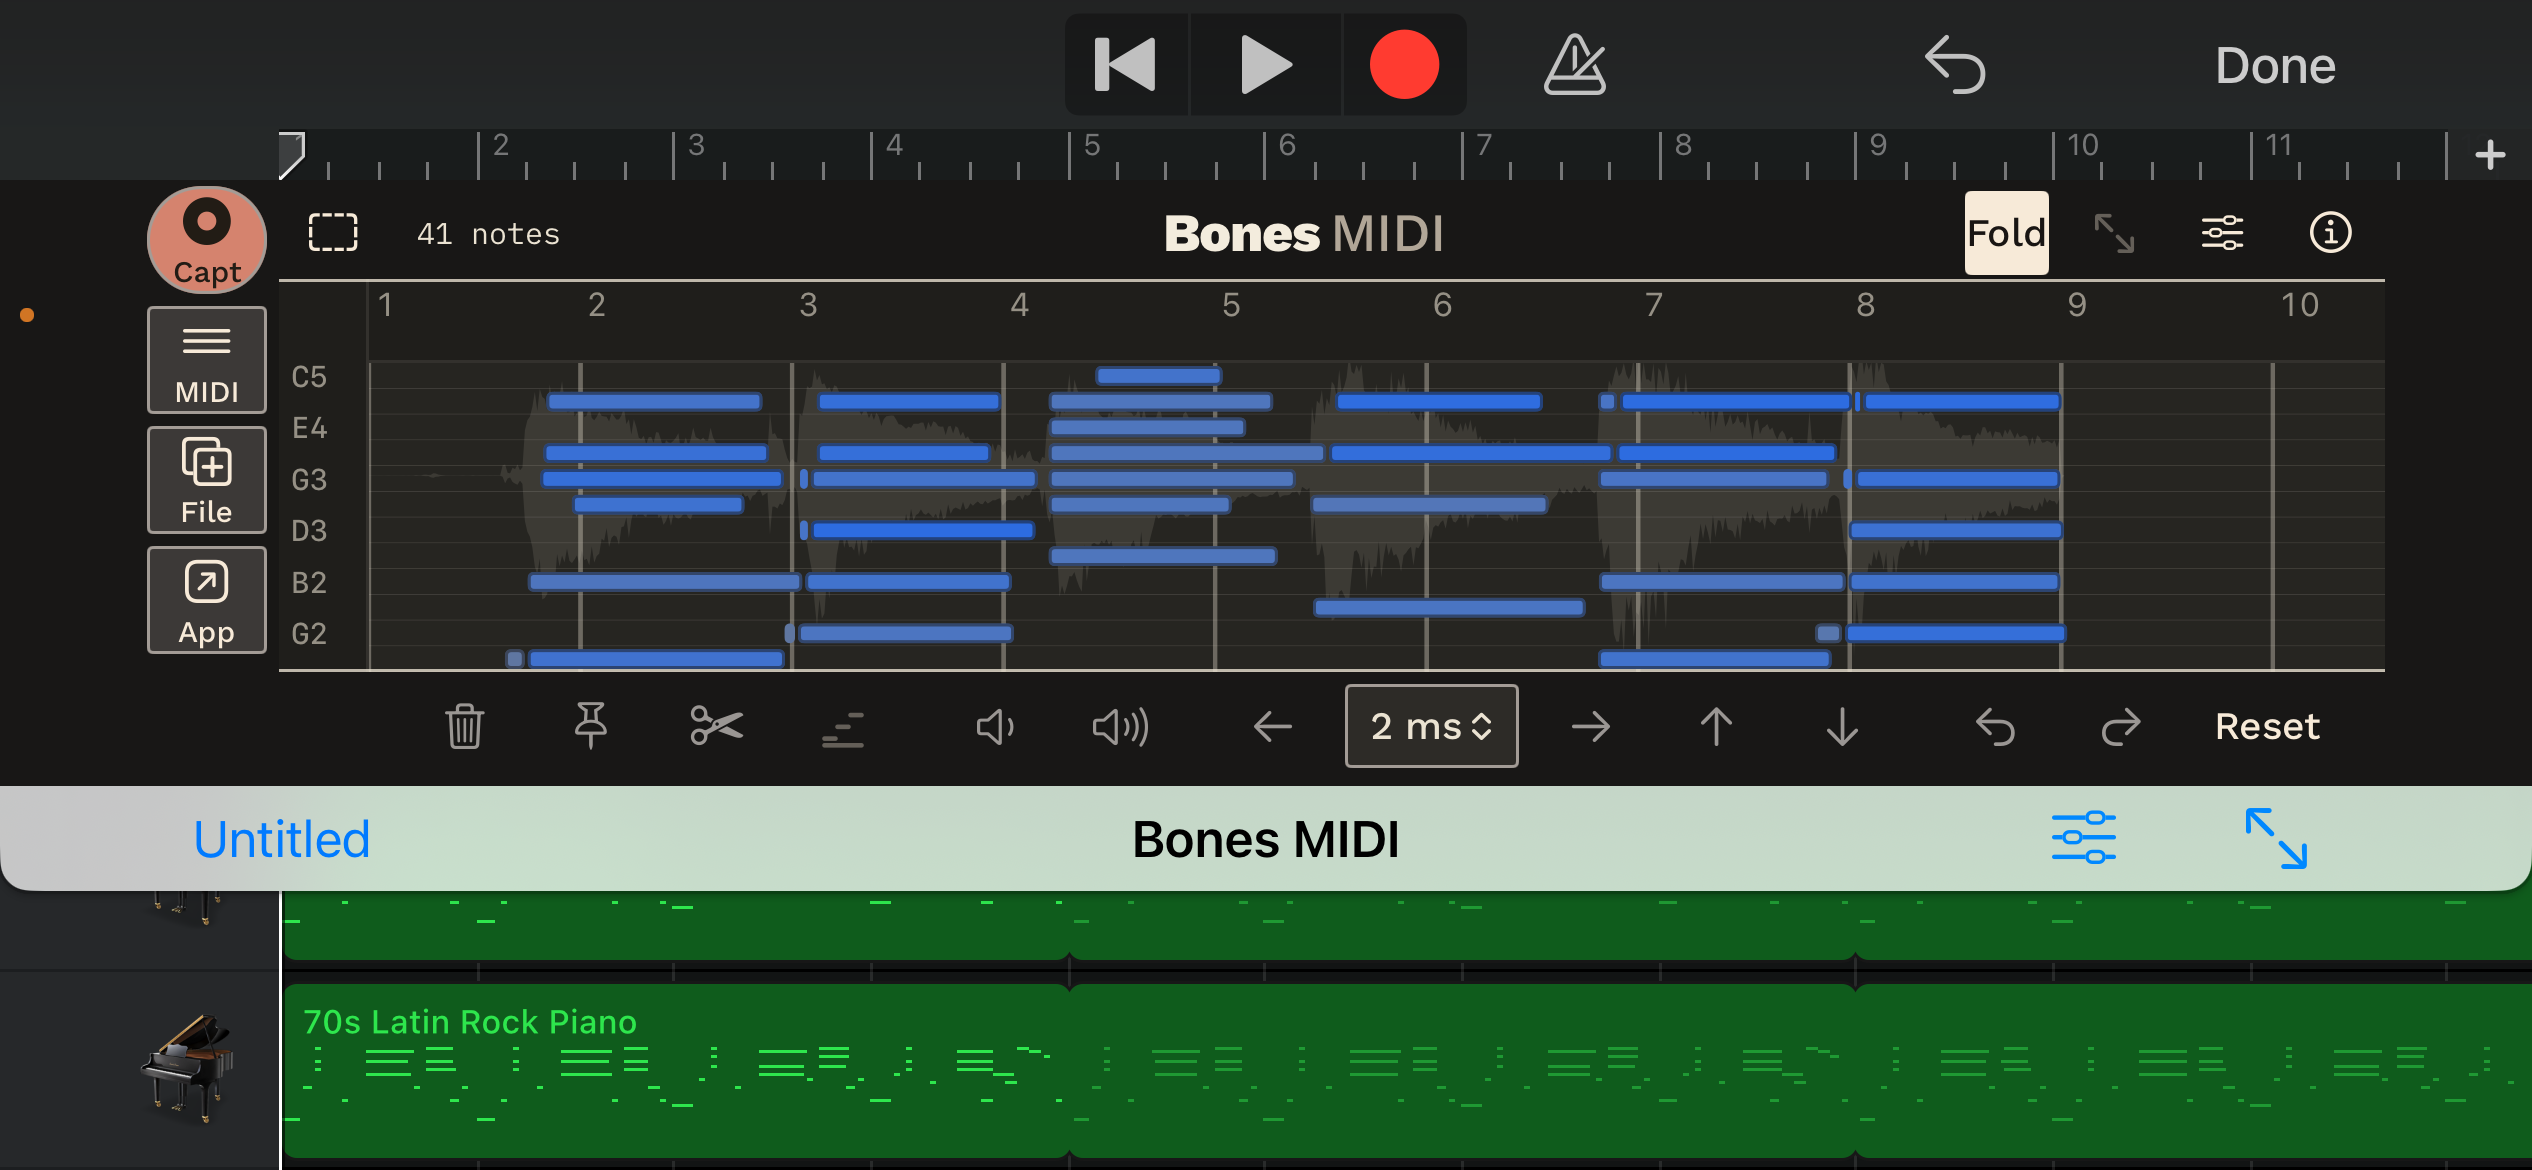
When you’re done, there are several ways to get the notes back into your host (see Ways out).
GarageBand setup
- Open or create an Audio Recorder track carrying your recording or live input.
- Open its track controls, then Plug-ins & EQ. Tap Edit, an empty effect slot, and Audio Unit Extensions; choose Bones MIDI.
- Open the plugin. For a recorded part, position the host playhead before it; for live input, connect headphones and enable the track’s input monitoring.
AUM setup
- Tap +, choose Audio, and select the channel input carrying your instrument or recording, such as a hardware input or file player.
- Tap + in an effect slot and choose Bones MIDI from the Audio Unit Extensions.
- Open its window and make sure audio reaches the channel before capturing.
Cubasis setup
Cubasis sends live input through a track’s effects only while the track’s Monitoring is on, and it allows monitoring only when headphones, an external microphone, or an audio interface is connected.
- On an audio track, in one of the insert slots, choose Bones MIDI from the Audio Unit effects, and open it.
- Live: connect headphones (AirPods work), turn on the track’s Monitoring, and check you can hear yourself. Tap Capture and sing or play; the Cubasis transport can stay stopped. Tap Stop when done.
- Recorded part: move the playhead to the start of the part, tap Capture, then press Cubasis Play. Capture stops when Cubasis stops.
- To bring the notes into Cubasis, save the MIDI file from the plugin, then import it (drag it from Files into the MediaBay or a track, or use MediaBay Import).
For host details, see the GarageBand guide and AUM guide.
Capture and adjust
Capture records whatever reaches the plugin: the host’s playback, or you playing live. Tap Capture, play the phrase, then tap Stop. The plugin detects the notes right away. A take can be up to four minutes long. At that point capture stops and transcribes on its own, so use the app for anything longer.
Detection works as in the app (§8): Poly, Mono or Voice, plus Pitch range, Sensitivity, Splits, Min length or Pitch Hold, and Dynamics. The Controls button beside Fit shows or hides them. In a short window they open in a tray. Source/Sound switches between hearing the recording and hearing the notes.
Editing also works as in the app (§9). Hold a note briefly, then drag it; drag near an end to change its length. To select several notes, tap the dashed square in the top-left corner. A bigger window shows more buttons (Delete, Undo/Redo, timing, pitch, velocity, Scale), and a small one keeps only the essentials. Fit brings every note into view. Fold shows only the pitches that have notes.
Your edits stick. Changing detection settings leaves edited notes alone. Keep note pins the selection exactly as it is (tap Clear edit to undo that). Split cuts one note in two, and Heal joins the selected notes into one. A deleted note leaves a dashed outline you can tap to bring it back. Reset returns the take to its original notes and settings, and Undo reverses a Reset.
Preview and looping a phrase
Preview lets you hear the take without starting the host. It works where the host lets the plugin play on its own, for example AUM, or GarageBand with Monitor on. Tap Play to hear the take through Source/Sound, and tap again to stop. Tap the ruler, or double-tap an empty part of the roll, to play from that point. While the host is playing, you hear the host instead.
Hold Play to loop a phrase while you fix it. Select some notes first and the loop covers that stretch of time, rounded out to whole bars when the take has the host’s bar grid. With nothing selected it loops the whole take. Your edits are heard on the next pass without restarting the loop. Tap the ruler inside the loop to jump around in it, or outside it to leave the loop. Stop ends the loop. It also ends when the host starts playing or you capture a new take.
Ways out
| Host | Best way out |
|---|---|
| GarageBand | File, then import from iCloud Drive (see below) |
| Cubasis | MIDI: drag it onto a track, or use File |
| AUM | Live MIDI out to an instrument, or drag MIDI into Files beside it (iPad) |
| Any host | App saves the take to your Bones MIDI library to keep working there |
If a way out does nothing in your host, use File or App.
- File saves a
.midto iCloud Drive → Bones MIDI; import it with your host’s file picker. It’s hidden when iCloud Drive is unavailable. - App saves the take to your Bones MIDI library. Tap the notification, or open Bones MIDI yourself, to keep editing. It doesn’t need iCloud Drive.
- MIDI (a grip above the word) drags the take, edits included, straight onto a track in hosts that accept a dropped MIDI file. The first time, it explains the gesture instead: tap Got it, then hold MIDI again and drag. GarageBand doesn’t keep dragged MIDI, so use File there. In narrow host windows More opens the detection controls.
- Live MIDI out plays the notes into another instrument as they sound, during host playback and Preview. It’s always on; connect Bones MIDI to an instrument in your host’s MIDI routing. GarageBand and Cubasis don’t pass MIDI from effect plugins. Bones MIDI still plays its own sound, so turn its channel down if you only want the instrument.
Wait for the plugin’s confirmation before looking for the result. File reports the saved filename; App reports that the take was sent to the library. Open Bones MIDI manually if no notification appears.
In GarageBand, use Loop Browser → Files → Browse items from the Files app, then iCloud Drive → Bones MIDI. Follow the GarageBand import guidance below to avoid a grayed-out track or truncated region.
14. On the Mac
Bones MIDI for Mac is coming later. The initial release is for iPhone and iPad. We’ll add Mac installation and usage instructions here when the Mac version is available.
15. Tips & troubleshooting
Getting the cleanest transcription
Record one instrument, up close, in a quiet room. Keep attacks clear and notes steady; overlapping instruments and room noise make separation harder. Choose Mono for a single line, Poly for chords, or Voice for singing. Tune first with Tuner on the recording screen. For a sung idea, “bah” gives repeated notes clearer boundaries than humming.
Common fixes
- Notes you did not play: use Mono for a single line, lower Sensitivity in Poly, raise Min Length, or narrow Range. Compare with the source before deleting.
- Missing quiet notes: raise Sensitivity in Poly or lower Min Length. Check that Range includes their pitches.
- Low rumble or high ghost notes: narrow the pitch Range to your instrument.
- One long note instead of repeated notes: raise Splits toward More in Poly or Mono. Its Off position disables splitting. In Voice, split the note by hand.
- Sung notes break apart or merge: adjust Pitch Hold in Voice; split a missed repeated attack at the same pitch by hand.
- Loose timing: create or edit the Beat Map, then use Quantize in Timing.
- Nothing detected: check that the recording contains audible, clearly pitched sound. Percussive or heavily distorted material may not transcribe. In the plugin, check the host is sending audio into the effect.
Bringing a MIDI file into GarageBand for iOS
Import through Loop Browser → Files → Browse items from the Files app.
Select your .mid, then drag it into Tracks view. Two host rules can prevent
the result you expect:
- Drop into empty space below the tracks to create a new Keyboard track, or use an existing software instrument track. MIDI cannot sit on an Audio Recorder track: GarageBand grays it out with a “no entry” badge. The audio track used for plugin capture is not the destination for the MIDI region.
- Set the song section length to Automatic, or enough bars for the take. Otherwise GarageBand silently cuts the imported region at the section end. Open section controls with + at the right of the track area, adjust the length, and import again if the take arrived short.
Reporting a problem, getting help
You can send problems, suggestions and questions from inside the app, and you don’t need an account. There are three ways in:
- Settings → Help → Help & feedback → Send feedback
- Report this recording: tap a recording’s name at the top of the editor, or long-press it in the Library.
- Report this problem: offered on the error when capture, transcription or export fails.
Write a message. Adding your email is optional, but without it nobody can reply to you. Turn on Include audio and transcription to attach the take so the problem can be reproduced. It’s off by default, nothing uploads until you tap Send, and attached recordings are deleted after 30 days. Technical details included shows exactly what else is sent.
When the report arrives, you’ll see Report received and a reference number. If sending fails, the report waits on your device. Open Help & feedback to try again.
You can also choose Save a report file instead and upload the file at bonesmidi.com/report. For anything else, email contact@bonesmidi.com.